MATERIALS TRANSACTIONS
Online ISSN : 1347-5320
Print ISSN : 1345-9678
ISSN-L : 1345-9678
Volume 62, Issue 4
Displaying 1-16 of 16 articles from this issue
Regular Article
Materials Physics
  • Akira Takeuchi
    Article type: Regular Article
    2021 Volume 62 Issue 4 Pages 469-478
    Published: April 01, 2021
    Released on J-STAGE: March 25, 2021
    JOURNAL FREE ACCESS FULL-TEXT HTML

    The intrinsic adsorption of a Cs+ ion into di- and tri-octahedral vermiculites without the presence of K+ ions was demonstrated by a classical molecular dynamics (MD) simulation. The calculation conditions included Coulomb and Born–Mayer–Huggins potentials, assisted by Lennard–Jones potentials under a constant pressure ensemble and valences from a force field for clays (CLAYFF) mainly as well as conventional valences. A monoclinic di-octahedral vermiculite crystal with a 6 × 3 × 1 supercell was created using crystallographic data from a monoclinic tri-octahedral vermiculite, followed by conversion to a rectangular supercell with periodic boundary conditions along the x-axis. The simulated rectangular supercell of the di- and tri-octahedral vermiculite maintained its crystalline structure for 1 ps at 298 K using a constant step of 0.1 fs. Vacancies with diameters of 0.15 nm, which is nearly equal to the ionic size of Cs+, or larger were found at the octahedral (O)-sheet only in the di-octahedral vermiculite simulated with valences from CLAYFF. The further MD simulations were performed by placing a Cs+ ion at a vacancy at the O-sheet of the simulated state of the di-octahedral vermiculite, revealing that a vacant site can be a candidate of adsorbing Cs+ ion. The low degree of crystallinity of the di-octahedral vermiculite because of the octahedral cationic vacancy and the tilting of hydroxyl (OH) group from perpendicular to (001) provided an additional site for absorbing Cs+ ion in the O-sheet. The simulation result of the di-octahedral vermiculite simulated with valences from CLAYFF suggested a novel mechanism for Cs+ ions to firmly adsorb into vermiculite without being desorbed again.

    Fig. 5 (a), (b) Polyhedral views of the di-octahedral vermiculite simulated with CLAYFF valences without drawing the O ion and containing Cs+ ion in the vacancy at its states of t = 0 and 5 ps. (c), (d) The trajectories of Cs+, drawn with red curves on the Cs+ as a ball view, together with those of Si and Al ions drawn with red and green curves, respectively, of the di-octahedral vermiculite at t = 0 and 5 ps. Fullsize Image
Mechanics of Materials
  • Takahiro Kunimine, Yohei Tomaru, Minami Watanabe, Ryoichi Monzen
    Article type: Regular Article
    2021 Volume 62 Issue 4 Pages 479-483
    Published: April 01, 2021
    Released on J-STAGE: March 25, 2021
    Advance online publication: March 05, 2021
    JOURNAL FREE ACCESS FULL-TEXT HTML

    Tensile deformation behavior of high-strength nanostructured Cu–Si solid-solution alloys processed by high-pressure torsion (HPT) with 5 rotations was investigated at room and low temperatures. With increasing Si concentration, tensile strength of the nanostructured Cu–Si solid-solution alloys was significantly increased. The maximal tensile strengths were 980 MPa at room temperature, and 1350 MPa at 77 K in a Cu–2.04 wt.%Si alloy. This significant strengthening was achieved by grain refinement and increased dislocation density through severe plastic deformation (SPD) with the effect of Si addition on the decreasing stacking fault energy of the Cu–Si alloy. With increasing Si concentration, strain-rate sensitivity m of the nanostructured Cu–Si solid-solution alloys was decreased due to the increased dislocation density, resulting in accelerating plastic instability of tensile specimens, caused by the diminishing strain-rate hardening capacity after necking.


    This Paper was Originally Published in Japanese in J. Japan Inst. Copper 59 (2020) 299–303. Some sentences were added in the main text of this paper. References of 2) and 5–11) were newly added.

    Fig. 6 Strain-rate sensitivity vs. grain size in pure Cu and the Cu–Si solid-solution alloys processed by the HPT with 5 rotations. The open squares are the data obtained from the literature by Wei et al. for pure Cu.14) Fullsize Image
  • Kenta Oka, Ryota Fukumori, Masayuki Tsushida, Hiromoto Kitahara, Shinj ...
    Article type: Regular Article
    2021 Volume 62 Issue 4 Pages 484-491
    Published: April 01, 2021
    Released on J-STAGE: March 25, 2021
    Advance online publication: February 26, 2021
    JOURNAL FREE ACCESS FULL-TEXT HTML

    Pure magnesium and Mg–Y alloy single crystals were subjected to three-point bending tests to investigate the effect of crystal orientation and yttrium on bending deformation behavior. Specimens whose neutral planes are parallel to (0001) and neutral axes are [1120] deformed due to basal slips, displaying a gull-shape. Their bending yield stresses increased by addition of yttrium and were controlled by the shear stress on the basal plane. Conversely, neutral planes parallel to (1100) and neutral axes are [1120] resulting in specimens deformed due to {1012} twins occurred at the compression side, basal slips within the twins and finally showed a V-shape. In Mg–Y alloys, first order pyramidal ⟨c + a⟩ slips (FPCS) and {1011}-{1012} double twins were also activated in the tension area. Their bending yield stresses and bending ductility increased by yttrium addition. Strain induced by {1011}-{1012} double twins at the tension side was very low. FPCS was found to be activated by addition of yttrium and to increase bending ductility.


    This Paper was Originally Published in Japanese in J. Japan Inst. Met. Mater. 84 (2020) 344–351.

    Fig. 13 Optical micrographs of (a) 0.15Y-E1 after yielding, (b) basal slips within {10-12} twins in compression area and (c) slip lines caused by FPCS and twins in tension area. Fullsize Image
Materials Chemistry
  • Ippei Shinozaki, Yohei Sakakibara, Gen Nakayama, Eiji Tada, Azusa Ooi, ...
    Article type: Regular Article
    2021 Volume 62 Issue 4 Pages 492-497
    Published: April 01, 2021
    Released on J-STAGE: March 25, 2021
    JOURNAL FREE ACCESS FULL-TEXT HTML

    In this study, the effects of Fe3+ on corrosion behavior of high-purity aluminum (Al) were investigated in aqueous NaCl solutions containing Fe3+ using immersion tests, electrochemical analysis, and surface observations. For high-purity Al immersed in an Fe3+ solution, the open circuit potential was much lower and the corrosion rate was higher than that of high-purity Al in a solution without Fe3+. The corrosion morphology of high-purity Al after immersion in the test solutions containing Fe3+ was mainly general corrosion; this differed significantly from the morphology of the Al immersed in a NaCl solution without Fe3+. The effects of Fe3+ on the corrosion behavior of high-purity Al were due to a less-protective passive film composed of Al(OH)3 and Fe(OH)3 that formed on high-purity Al during immersion.

    Fig. 11 Schematic diagram of passive film of Al formed after immersion in the test solutions: (a) without Fe3+ and (b) with Fe3+. Fullsize Image
Materials Processing
  • Hirokazu Tanaka
    Article type: Regular Article
    2021 Volume 62 Issue 4 Pages 498-504
    Published: April 01, 2021
    Released on J-STAGE: March 25, 2021
    Advance online publication: February 19, 2021
    JOURNAL FREE ACCESS FULL-TEXT HTML

    In the brazing process of an automobile radiator, eutectic melting of the Al–Si filler alloy of the clad sheets, fillet formation in the brazed joints, and the flow of the molten filler metal on the solid core metal between joints occur continuously. With regard to designing heat exchangers, the optimum placement of the filler metal, considering the flow of the molten filler metal, is an important subject. In this study, a new numerical analysis was applied to predict the shape of the fillets and the molten filler flow. The molten filler flow was calculated using the difference method applied to a one-dimensional unsteady flow that is assumed to be a uniform flow of incompressible viscous fluid between two parallel plates. Among some numerical results, when the hydraulic mean depth of the flow path was reduced 0.3 times, the calculation results were consistent with the actual values. It was necessary to narrow the flow path because it was calculated assuming that the flow of brazing was between two parallel flat plates, whereas the actual flow path of the molten filler metal was not flat and a large flow resistance was produced.

    Comparison of actual and numerical data for fillet membrane at each joint. Fullsize Image
  • Akira Shiga, Tomohiro Yamashita, Yutaka Neishi, Osamu Umezawa
    Article type: Regular Article
    2021 Volume 62 Issue 4 Pages 505-511
    Published: April 01, 2021
    Released on J-STAGE: March 25, 2021
    Advance online publication: February 19, 2021
    JOURNAL FREE ACCESS FULL-TEXT HTML

    To apply hollow forming technology for car parts, it is necessary to understand the ductile fracture mechanism of hollow forming. In this study, the cold drawing test and the finite element method analysis (FEM) of hollow specimens were carried out. It was clarified that the ductile fracture of hollow specimens in cold drawing was affected by both stress triaxiality and Lode angle parameter. As a result of fracture observation of a hollow specimen, an equiaxed dimple and an elongated dimple were observed. A mixed-mode ductile fracture mechanism (shear deformation of voids and typical void growth and coalescence) for hollow specimens in cold drawing is assumed.


    This Paper was Originally Published in Japanese in J. JSTP 61 (2020) 33–39.

  • Ryo Matsumoto, Shota Komaki, Ryohei Homi, Hiroshi Utsunomiya
    Article type: Regular Article
    2021 Volume 62 Issue 4 Pages 512-518
    Published: April 01, 2021
    Released on J-STAGE: March 25, 2021
    Advance online publication: February 15, 2021
    JOURNAL FREE ACCESS FULL-TEXT HTML

    NiAl intermetallic compound was formed by laser irradiation on powder mixture of nickel and aluminum. In laser irradiation with an average energy density of 150 J/mm2 using a continuous wave 50 W Nd:YAG laser, Ni–49 at% Al powder mixture was immediately heated up to a temperature above 1680 K by reaction heat on the interface between nickel and aluminum powders. As the result, the powder mixture was ignited with maximum bulk volume of approximately 1.0 × 104 mm3, and the powder mixture was partly melted. After solidification of the melted part by natural cooling, the formation of NiAl intermetallic compound was confirmed from the results of microscopic observations, hardness measurement, EDX and XRD analyses.

  • Tomonobu Owa, Yasuo Shimizu, Shoji Kaiume, Yoshio Hashimoto
    Article type: Regular Article
    2021 Volume 62 Issue 4 Pages 519-525
    Published: April 01, 2021
    Released on J-STAGE: March 25, 2021
    JOURNAL FREE ACCESS FULL-TEXT HTML

    Graphite-reinforced 5083 aluminum matrix composites were successfully fabricated via friction stir processing. The graphite-reinforced aluminum alloy sheet sintered at 550°C in a vacuum atmosphere was applied as a reinforcement. Grain refinement and many minute aluminum carbides (Al4C3) were observed in the composites fabricated. The tensile strength of the composites fabricated with the 550°C sintered sheets considerably increased by 64 percent, and the sliding wear characteristics of the composites were appreciably improved compared with that of the base material.

    Fig. 7 Stress-strain curves for base material and graphite/aluminum composites (a) and summary for mechanical properties (b)–(c). Fullsize Image
Engineering Materials and Their Applications
  • Masahiko Shioda, Tatsuhiko Mochizuki, Yukihiro Kishimoto
    Article type: Regular Article
    2021 Volume 62 Issue 4 Pages 526-531
    Published: April 01, 2021
    Released on J-STAGE: March 25, 2021
    JOURNAL FREE ACCESS FULL-TEXT HTML

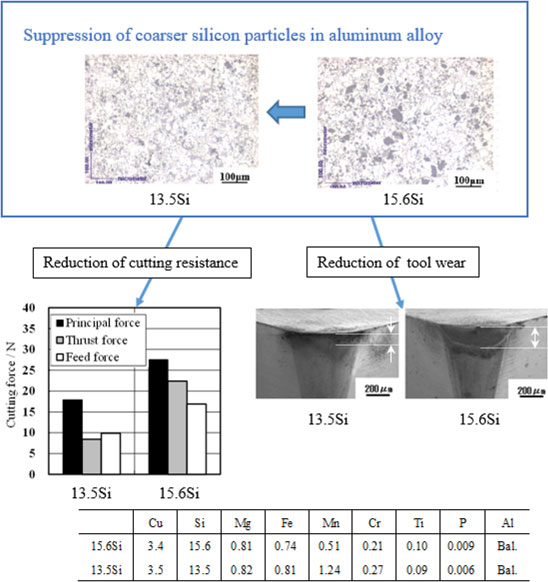
    Tool wear and wear mechanism of carbide cutting tool in turning Al–Si alloy diecastings were investigated. Decreasing amount of coarse primary silicon was effective for reducing cutting resistance and cutting tool wear. New hyper-eutectic Al–Si system alloy which doesn’t contain coarser silicon particles provided good turning machinability equivalent to conventional eutectic Al–Si system alloy. In case of increasing feed rate from 0.05 mm/rev to 0.10 mm/rev, cutting tool wear of conventional hyper-eutectic Al–Si system alloy increased. On the other hand, that of eutectic Al–Si system alloy decreased, and that of new hyper-eutectic Al–Si system alloy didn’t changed. Built-up edge and aluminum deposit on the flank wear land were observed in all aluminum alloys.


    This Paper was Originally Published in Japanese in J. JILM 69 (2019) 174–149.

  • Toshihiro Hara, Daisuke Egusa, Mami Mihara, Hiroki Tanaka, Ikuo Ohnuma ...
    Article type: Regular Article
    2021 Volume 62 Issue 4 Pages 532-538
    Published: April 01, 2021
    Released on J-STAGE: March 25, 2021
    Advance online publication: February 05, 2021
    JOURNAL FREE ACCESS FULL-TEXT HTML

    We have investigated the work softening (WS) phenomena during a cold-roll process of an Al–Fe alloy, based on hardness measurements, electron microscopy observations, and thermodynamic calculations. The WS behavior was confirmed in the Al–Fe alloy when the rolling rate was larger than 80%, which contained fine grains with severe deformation. In contrast, the behavior and microstructural features were hardly observed in the A1050 alloy. Composition analyses showed that almost all Fe in the present Al–Fe alloy form the θ-Al13Fe4 phase, in which a trace impurity element, Si, is found to be significantly segregated. This Si partitioning behavior is confirmed by the thermodynamic calculations and consequently leads to a higher purification of the relevant Al matrix as being almost close to the 4N (99.99 mol%) level, known as a “scavenging effect” of the impurities. It can be concluded that the highly purified aluminum matrix provides an intrinsic origin of the WS of the present Al–Fe alloy. Significant reductions of the impurities may lead to an extended mean-free path of dislocation motions and related grain boundary effects, which promote the occurrence of dynamic recovery and/or recrystallizations at severe deformation ranges even during the cold-roll process.


    This Paper was Originally Published in Japanese in J. Japan Inst. Met. Mater. 84 (2020) 406–412.

    Fig. 3 (a)–(d) SEM-BSE images and Fe-EDS maps of Al050 alloy and Al–Fe alloy, respectively, each of which was independently obtained from representative areas of the samples. (e) TEM bright field image and selected area diffraction pattern obtained from the Al–Fe compound in Al–Fe alloy. (f) Fe and Si compositions of the θ phase in Al–Fe alloy obtained by SEM-EDS point analyses. A black line represents a regression line of the Si/Fe ratio estimated by the least-squares method. A gray region represents a prediction interval of the regression line with one sigma. (g) HAADF-STEM image of the θ phase in Al–Fe alloy and a line profile of Si k-edge photon counts of the relevant EDS spectra taken across the Al matrix to the θ phase. Fullsize Image
  • Yasutaka Hashimoto, Takafumi Kojima, Teruyuki Ikeda
    Article type: Regular Article
    2021 Volume 62 Issue 4 Pages 539-543
    Published: April 01, 2021
    Released on J-STAGE: March 25, 2021
    Advance online publication: February 19, 2021
    JOURNAL FREE ACCESS FULL-TEXT HTML

    Diffusion bonding of silicon and pure silver was performed and the bonding strength and electrical resistivity were measured. Diffusion bonding was performed under a uniaxial pressure (10, 20 MPa) at 1103 K in an argon atmosphere and bonding status was observed using a scanning electron microscope. It was found that the strength of a joint increases as the bonding time increases until 90 min for both the bonding pressures. There is no clear trend in resistivity variation with bonding time. In addition, the resistance increased by about 0.3% compared to that of silicon only. Silver is a good candidate for an electrode material for silicon because it is bonded to silicon well and there is no insulating layer formed such as an intermediate compound.

  • Shuntaro Abe, Koji Oishi, Yoshihiro Terada
    Article type: Regular Article
    2021 Volume 62 Issue 4 Pages 544-550
    Published: April 01, 2021
    Released on J-STAGE: March 25, 2021
    Advance online publication: February 26, 2021
    JOURNAL FREE ACCESS FULL-TEXT HTML

    To evaluate the stability of α-Mg/C14–Mg2Ca lamellar microstructure, aging treatment was carried out for a Mg–14.8 mass% Ca near-eutectic alloy at 573–723 K for 1–150 hours. The spacing of the lamellar microstructure obtained by the eutectic transformation L → α-Mg + C14–Mg2Ca during solidification was approximately 250 nm. High-resolution transmission electron microscopy observations show that the α/C14 interface is composed of terraces and steps, with terraces parallel to the (1101) pyramidal plane of the α-Mg lamellae. The α/C14 lamellar microstructure is stable in morphology at temperatures below 573 K. In contrast, the lamellar spacing (λ) continuously increases with increasing aging time (t) above 573 K, and the increase in λ can be described as λ2 − λ02 = kTt, where λ0 is the α/C14 lamellar spacing for the as-cast specimen, and kT is a constant depending on aging temperature. The activation energy for the coarsening of α/C14 lamellar microstructure was evaluated as 112 kJ/mol, which is close to the activation energy for the inter-diffusion of Ca in Mg. The hardness of the α/C14 lamellar region decreases with increasing λ, indicating that the α/C14 interface acts as an obstacle to the basal slip of dislocations in α-Mg lamellae.


    This Paper was Originally Published in Japanese in J. Japan Inst. Met. Mater. 84 (2020) 399–405. The abstract of this paper, together with the caption (Table 1 and Figs. 1–10), are slightly changed through the English polishing service by native speakers, compared to those of the paper published in J. Japan Inst. Met. Mater.

    Fig. 3 FE-SEM image of α-Mg/C14–Mg2Ca lamellar microstructure observed in the Mg–14.8 mass% Ca alloy. The bright phase is α-Mg, while the dark phase is C14–Mg2Ca. Fullsize Image
Environment
  • Jun Katagiri, Takao Ueda, Naohito Hayashi, Shigeki Koyanaka
    Article type: Regular Article
    2021 Volume 62 Issue 4 Pages 551-556
    Published: April 01, 2021
    Released on J-STAGE: March 25, 2021
    Advance online publication: March 05, 2021
    JOURNAL FREE ACCESS FULL-TEXT HTML

    Using the genetic algorithm, this paper developed an automatic method for calibrating the used four input parameters (Young’s modulus, Poisson’s ratio, coefficient of restitution, and friction coefficient) in the discrete element modeling (DEM) of vibration feeders. Two objective functions were used: (1) the difference in the results between the DEM simulation and the experiment and (2) the computation time of the DEM simulation. We conducted preliminary experiments to obtain an average experimental response of the vibration feeding and found that single-item-clogging usually arises near the feeder tray outlet. The proposed method managed to find the required set of parameters for minimizing the two objective functions by multi-objective optimization using the genetic algorithm. Overall, we confirmed that the obtained parameter values were physically reasonable in comparison with those of previous studies.

Technical Article
  • Takuya Naeshirozako, Nobuyuki Takeuchi, Masaru Sugiyama, Hiroyuki Tera ...
    Article type: Technical Article
    2021 Volume 62 Issue 4 Pages 557-562
    Published: April 01, 2021
    Released on J-STAGE: March 25, 2021
    Advance online publication: February 19, 2021
    JOURNAL FREE ACCESS FULL-TEXT HTML

    The corrosion behavior of six types of polycrystalline wool blanket samples, which were composed of alumina and silica, and exposed to Na2CO3 vapor at 1350°C for 24 h, was investigated. The corrosion in sample A100 (Al2O3: 99.6 mass%) by alkaline vapor was suppressed remarkably as the corundum phase changed to the β-alumina (Na2O·11Al2O3) phase only at the surface of the fiber, and the surface layer functioned as a protective layer against corrosion. The corundum phase in sample A95 (Al2O3: 94.9 mass%) changed slightly to β-alumina due to the formation of the carnegieite phase via the decomposition of mullite phase corroded by alkaline vapor. The corrosion in samples A80 (Al2O3: 80.2–80.8 mass%) and A72 (Al2O3: 72.2–73.2 mass%) by alkaline vapor was more intense than that in samples A100 and A95 because of the high silica content. Alkaline vapor remained near the reaction surface and reacted locally with fibers in a narrow region because the area of the amorphous phase in the high-density samples (A80-H and A72-H) was wider than that in the low-density samples (A80-L and A72-L), and the permeability of the vapor was low in the high-density samples. The carnegieite phase, which was present in the temperature range of 1000–1300°C, disappeared and the amorphous phase was simultaneously formed during alkaline vapor exposure at 1350°C for 8 h in the corrosion process of A72-H.

Current Trends in Research
  • Takahito Ohmura
    Article type: Current Trends in Research
    2021 Volume 62 Issue 4 Pages 563-569
    Published: April 01, 2021
    Released on J-STAGE: March 25, 2021
    Advance online publication: February 19, 2021
    JOURNAL FREE ACCESS FULL-TEXT HTML

    This paper presents the current research trends in indentation techniques, especially on the micro- and nanoscales, and the application of such techniques for the mechanical characterization of various materials. The survey was carried out based on the special issue of Materials Transactions (Vol. 60, No. 8), published in August 2019. The indentation techniques have diversified, and they have been implemented in instrumentation specialized for in situ measurements, environmental control including elevated temperatures, and mechanical property evaluation of soft materials. These techniques can also be applied in a more fundamental manner to assist the physical modeling of plastic deformation and fracture. For each of the various topics, a brief introduction is given to the cutting-edge methods and novel approaches in characterization that offer opportunities for innovative developments in materials science.

    Fig. 1 Trend of the decennial number of publications on indentation-related research since around 1900. (Data were used from Scopus on Nov. 2020). Fullsize Image
Express Rapid Publication
  • Yusuke Shimada, Kosei Harada, Yoji Mine, Masahide Yoshimura, Kazuki Ta ...
    Article type: Express Rapid Publication
    2021 Volume 62 Issue 4 Pages 570-573
    Published: April 01, 2021
    Released on J-STAGE: March 25, 2021
    Advance online publication: February 05, 2021
    JOURNAL FREE ACCESS FULL-TEXT HTML

    Temper embrittlement in high-strength steel occurs due to the segregation of impurity elements along prior austenite (γ) grain boundaries, resulting in a decrease in intergranular strength. However, the grain boundary properties have not yet been experimentally investigated. In this study, we developed a micro testing method to selectively process micro-cantilever specimens based on a specific prior γ-grain boundary to measure the grain boundary fracture toughness. Fracture toughness tests using micro-cantilever specimens with side grooves and notch were carried out at 183 K and brittle fracture behavior was successfully obtained. The fracture surface showed almost flat and brittle crack propagation along the prior γ-grain boundary. The derived fracture toughness value, KQ, is lower than that from previous values. By employing this method for the evaluation of intergranular fractures in steel, we believe that we can evaluate more intrinsic prior γ-grain boundary properties compared with conventional methods.

feedback
Top